All about selectors in CSS

What is a Selector?
A CSS selector is the first part of a CSS Rule. It is a pattern of elements and other terms that tell the browser which HTML elements should be selected to have the CSS property values inside the rule applied to them. The element or elements which are selected by the selector are referred to as the subject of the selector.
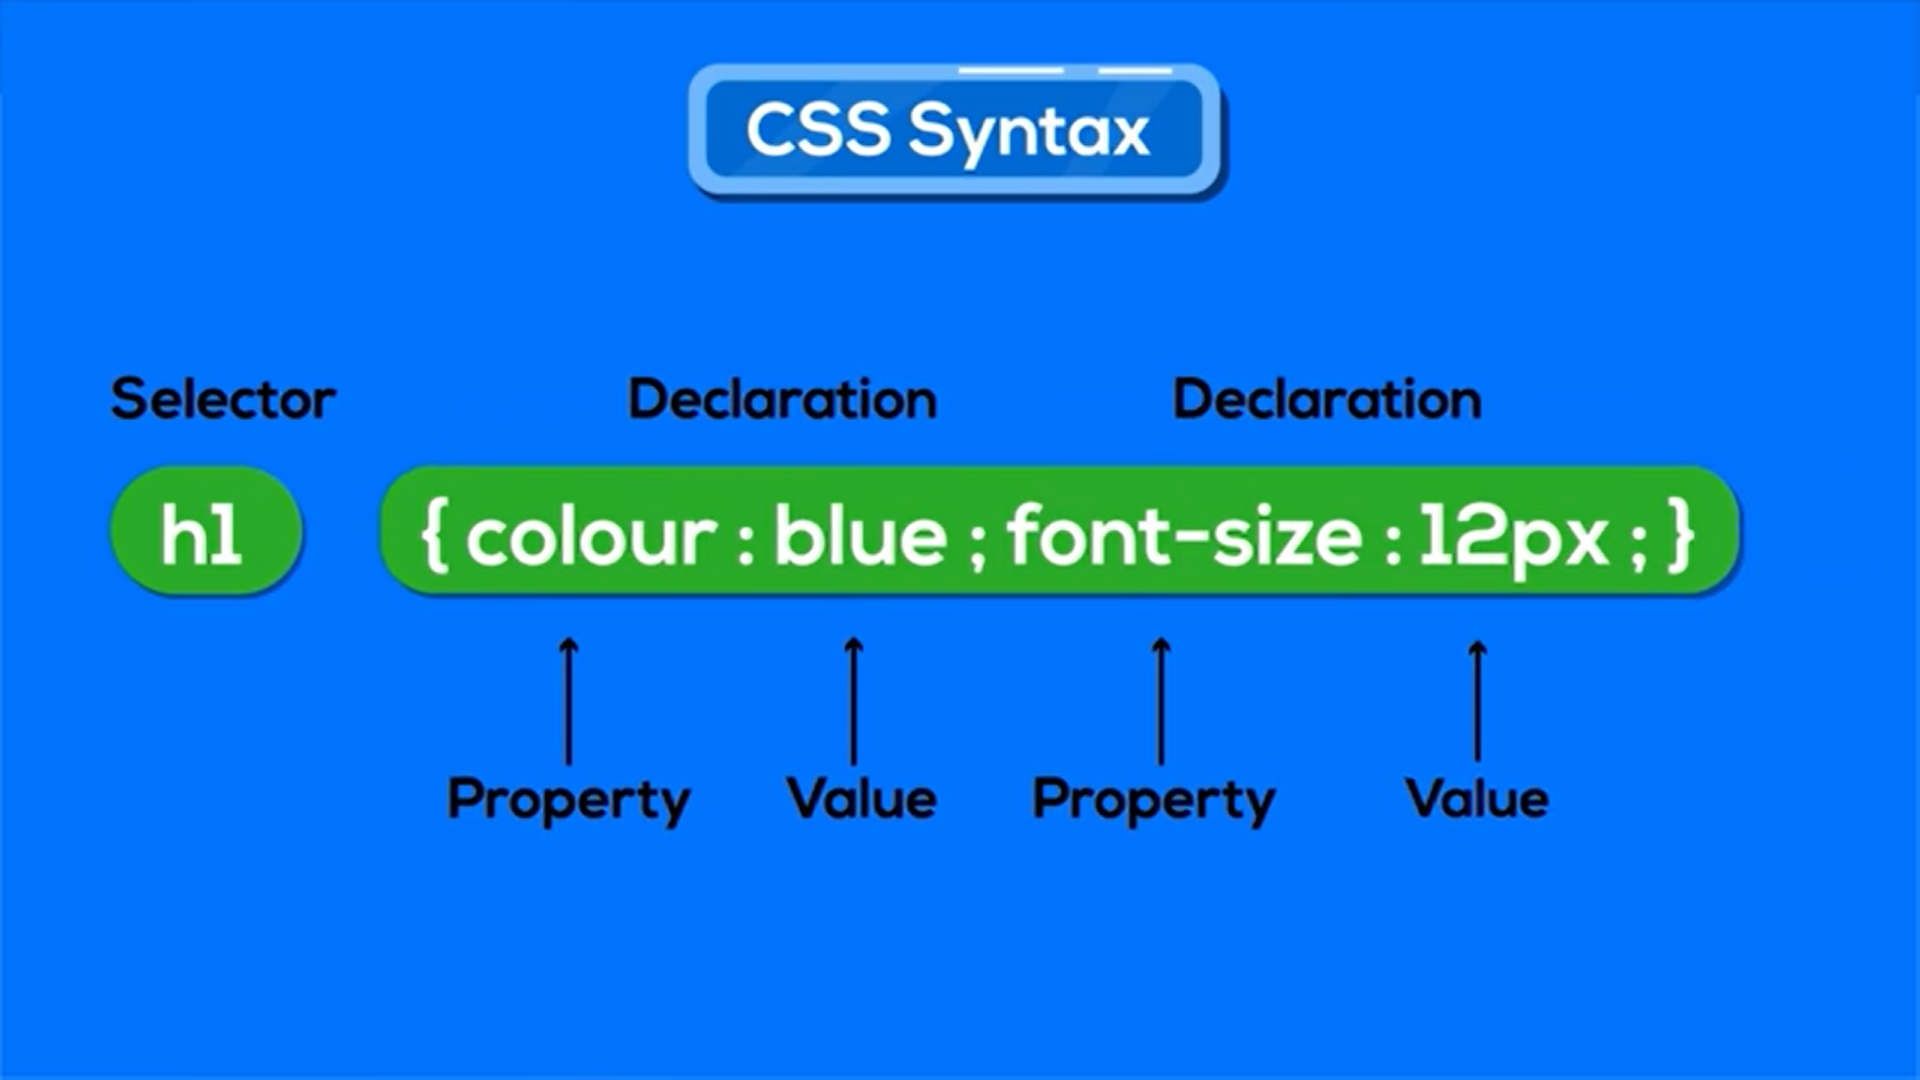
Syntax:
Selector { Property1: value; Property2: value; .......... }
CSS Selectors
CSS selectors define the elements to which a set of CSS rules apply.
The different types of CSS selectors are following
- Basic Selectors
- Grouping Selectors
- Combinators
- Pseudo Selectors
1. Basic Selectors
There are 5 types of Basic selectors
- Universal Selector
- Type Selector
- Class Selector
- ID Selector
- Attribute Selector
1.a. Universal Selector
We use the universal selector (*) to select all HTML elements on the same web page.
Every HTML element, from the header to the footer, follows the universal selector's style.
The asterisk (*) character represents Universal selectors.
Syntax:
  * {
       style properties ...
     }
Let us write a code to understand how the universal selector works.
/*CSS Code*/
* {
  color: Orange;
  text-transform: uppercase;
  font-size: 20px;
}
This will set the text color to orange and transforms all the text to UpperCase and font size to 20 pixels of all the elements on the page.
NameSpaces:
Universal selectors can be namespaced when using @namespace. This is useful when dealing with documents containing multiple namespaces such as HTML5 with inline SVG or MathML, or XML that mixes multiple vocabularies.
 ns|* - matches all elements in namespace ns
 *|* - matches all elements
  |* - matches all elements without any declared namespace
In this example, the selector will only match elements in the example namespace.
@namespace example url(http://www.example.com);
example|* { color: blue }
1.b. Type Selector
The Type selectors are used to select HTML elements based on the element name. It means, it selects all elements of the given type within a document.
Syntax:
/* It selects all the p elements and sets the text color to green.*/
p{
  color: green;
}
Let us write a code to understand how the type selector works.
/* CSS Code*/
p{
  background-color: orange;
  padding: 10px;
}
*/
By using "p" as a type selector, it only selects the paragraph tag elements and applies CSS properties that are specified inside the tag.
1.c. Class Selector
The Class selectors are used to select HTML elements based on the class attribute.
To select elements with a specific class, write a period (.) character, followed by the class name.
Syntax:
/* It selects all the elements which have the given class name  and assigns given CSS properties*/

.class-name {
   property: value;
}
Let us write a code to understand how the class selector works.
/*CSS Code*/
.box{
  height:50px;
  font-size: 20px;
  color:#fff;
  border-radius: 10px;
  padding: 20px;
}

.color1{
  background-color: orange;
}

.color2{
  background-color: blue;
}
Here the properties defined inside the box class will apply to all the three div tags because all have a class name as box .
But the properties inside color1 apply only to Block1 and Block3. The color2 properties will be applied to Block2.
1.d. ID Selector
The ID selectors are used to select HTML elements based on the value of its ID attribute.
To select elements with a specific class, write a period (#) character, followed by the ID name.
There should be only one element with a given ID in a document.
Syntax:
/* It selects all the elements which have the given ID name  and assigns given CSS properties*/

#id-name {
   property: value;
}
Let us write a code to understand how the ID selector works.
#box1{
  background-color: orange;
}

#box2{
  background-color: blue;
}
Here the properties defined inside the box1 id will apply to Block1. The box2 properties will be applied to Block2.
1.e. Attribute Selector
Attribute selectors select all elements that have a given attribute or attribute value.
Syntax:
[attr]
Represents elements with an attribute name of attr.

[attr=value]
Represents elements with an attribute name of attr whose value is exactly value.

[attr~=value]
Represents elements with an attribute name of attr whose value is a whitespace-separated list of words, one of which is exactly value.

[attr|=value]
Represents elements with an attribute name of attr whose value can be exactly value or can begin with value immediately followed by a hyphen, - (U+002D). It is often used for language subcode matches.

[attr^=value]
Represents elements with an attribute name of attr whose value is prefixed (preceded) by value.

[attr$=value]
Represents elements with an attribute name of attr whose value is suffixed (followed) by value.

[attr*=value]
Represents elements with an attribute name of attr whose value contains at least one occurrence of value within the string.

[attr operator value i]
Adding an i (or I) before the closing bracket causes the value to be compared case-insensitively (for characters within the ASCII range).

[attr operator value s] Experimental
Adding an s (or S) before the closing bracket causes the value to be compared case-sensitively (for characters within the ASCII range).
Here are some examples of attribute selectors.
/* <a> elements with a title attribute */
a[title] {
  color: purple;
}

/* <a> elements with an href matching "https://example.org" */
a[href="https://example.org"] {
  color: green;
}

/* <a> elements with an href containing "example" */
a[href*="example"] {
  font-size: 2em;
}

/* <a> elements with an href ending ".org" */
a[href$=".org"] {
  font-style: italic;
}

/* <a> elements whose class attribute contains the word "logo" */
a[class~="logo"] {
  padding: 2px;
}
Let us write a code to understand how the Attribute selector works.
a[target] {
    color: red;
    font-size: 20px;
}

a[href="www.link.com"] {
    color: blue;
    font-size: 20px;
}

a[href^="https://"] {
    color: brown;
    font-size: 20px;
}

a[href$=".pdf"] {
    color: purple;
    font-size: 20px;
}

a[rel~="tag"] {
     color: magenta;
     font-size: 20px;
}

a[href*="signin"] {
     color: cyan;
     font-size: 20px;
}

a[lang|="en"] {
     color: orange;
     font-size: 20px;
}
2. Grouping Selectors
CSS grouping selectors select all the HTML elements with the same style definitions. They will reduce the code and help us to write more specific codes.
Selector List
The CSS selector list (,) is a grouping method that selects all the matching nodes.
syntax:
element1, element2, element3 {
                             style properties
                             }
Single Line Grouping
Grouping selectors in a single line using a comma-separated lists.
h1, h2, h3, h4, h5, h6 {
                        color: orange;
                        }
Multi Line Grouping
Grouping selectors in a multiple lines using a comma-separated lists.
.info, #main, section {
                       color : red;
                       }
3. Combinators
Combination Selectors select elements based on a specific relationship between them.
A parent element contains other elements.
The child element is an element immediately contained by another element.
A sibling is an element that shares the same parent with another element.
<section>                     /* Parent to div tag and p tag*/
  <div>                       /* Child to section tag and Sibling to p tag */
    I am div tag.
  </div>
  <p>                        /* Child to section tag and Sibling to div tag */
    This is a paragraph.
  </p>
</section>
There are 4 types of combination selectors.
- Descendant Combinator
- Child Combinator
- General Sibling Combinator
- Adjacent Sibling Combinator
3.a. Descendant Combinator
The Descendant combinator selects nodes that are descendants of the first element.
To select Descendants, use multiple selectors separated by spaces.
syntax
selector1 selector2 {
                   /* property declarations */
                   }
Let us write some code to understand how the descendant combinator works.
article h2 {
    text-align: center;
    color: orange;
    font-size: 20px;
}
3.b. Child Combinator
The child combinator selects nodes that are direct children of the first element.
To use child combinator, (>) is placed between two CSS selectors. It matches only those elements matched by the second selector that are the direct children of elements matched by the first.
syntax:
selector1 > selector2 {
                      style properties
                       }
Let us write some code to understand how the Child combinator works.
article > h2 {
    text-align: center;
    color: orange;
    font-size: 20px;
}
3.c. General Sibling Combinator
The general sibling combinator (~) separates two selectors and matches all iterations of the second element, that are following the first element (though not necessarily immediately), and are children of the same parent element.
syntax
former_element ~ target_element {
                                  style properties
                                 }
Let us write some code to understand how the general sibling combinator works.
h2 ~ p {
     text-align: center;
     color: orange;
     font-size: 20px;
}
3.d. Adjacent Sibling Combinator
The adjacent sibling combinator (+) separates two selectors and matches the second element only if it immediately follows the first element, and both are children of the same parent element.
syntax
former_element + target_element {
                                  style properties
                                 }
Let us write some code to understand how the adjacent sibling combinator works.
h2 + p {
     text-align: center;
     color: orange;
     font-size: 20px;
}
4. Pseudo Selectors
There are two types of pseudo-selectors:
- Pseudo Class Selectors.
- Pseudo Element Selectors.
4.a. Pseudo Class Selectors
A CSS pseudo-class is a keyword added to a selector that specifies a special state of the selected element(s).
Example
- can be used to change a button's color when the user's pointer hovers over it.
- style visited and unvisited links.
The colon (:) character represents Pseudo class selectors.
syntax
selector:pseudo-class {
   property: value;
}
User action pseudo-classes
These pseudo-classes require some interaction by the user in order for them to apply, such as holding a mouse pointer over an element.
The most used User Action Pseudo-classes are:
- :hover
- :active
- :focus
:hover
:hover works when the user moves their cursor over an element but does not select it.
for example, holding the mouse pointer over it.
syntax
selector:hover {
    property: value;
}
:active
Matches when an item is being activated by the user, for example clicked on.
syntax
selector:active {
    property: value;
}
:focus
Matches when an element has focus.
syntax
selector:focus {
   property: value;
}
Location pseudo-classes
These pseudo-classes relate to links, and to targeted elements within the current document.
- :link
- :visited
:link
Matches links that have not yet been visited.
syntax
selector:link {
   property: value;
}
:visited
Matches links that have been visited.
syntax
:visited {
   property: value;
}
Tree-structural pseudo-classes
These pseudo-classes relate to the location of an element within the document tree.
The most common structural and positional pseudo-classes you will likely come across are the following:
- :first-child
- :last-child
- :Only-child
:first-child
Matches an element that is the first of its siblings.
syntax
:first-child {
   property: value;
}
:last-child
Matches an element that is the last of its siblings.
syntax
:last-child {
   property: value;
}
:only-child
Matches an element that has no siblings. For example a list item with no other list items in that list.
syntax
:only-child {
   property: value;
}
4.b. Pseudo Element Selectors
A CSS pseudo-element is a keyword added to a selector that lets you style a specific part of the selected element(s).
The double-colon (::) represents pseudo-element selectors.
For example, ::first-line can be used to change the font of the first line of a paragraph.
syntax
selector::pseudo-element {
   property: value;
}
Textual Pseudo-elements
The textual pseudo-elements consist of the:
- ::first-letter pseudo-element
- :first-line pseudo-element
::first-letter pseudo-element
The ::first-letter applies a style to the first letter of the element.
syntax
selector::first-letter {
   property: value;
}
:first-line pseudo-element
The ::first-line applies a style to the first line of the element.
syntax
selector::first-line {
   property: value;
}
Both the ::first-line and the ::first-letter pseudo-element work only for block elements.
Generated Content Pseudo-elements
The generated pseudo-element consists of the:
- ::before pseudo-element
- ::after pseudo-element
::before
The ::before pseudo-element adds content before the HTML element.
In CSS, ::before creates a pseudo-element that is the first child of the selected element. It is inline by default.
syntax
selector::before {
   property: value;
}
::after
The ::after pseudo-element adds content after the HTML element.
syntax
selector::after {
   property: value;
}
When using the ::after and ::before pseudo-elements we must use the content property to make your styles visible.
Closing
I hope that you’ve found this tutorial and code examples on CSS Selectors helpful! If you have any questions or feedback, feel free to leave a comment below 😊


